Saturday, December 29, 2012

The Morning Checklist

Picture this: the mom in sweatpants, hair pulled back in a pony, looking quite disheveled, the kids bickering back and forth, maybe they have their lunch box, backpacks mostly unzipped, shoes untied, mismatching socks, rushing through the car line at 7:59 when school starts at 8:00.  Sound familiar?

Believe it or not, this is NOT what our mornings look like!  In fact, it's quite the opposite.  How did we get these (mostly) perfect angel children that get ready (mostly) by themselves and are ready to walk out the door and get to school at 7:30? It's the magic of a "Morning Checklist".

The morning checklist consists of the following:

  1. Make bed and turn off all lights.
  2. Eat breakfast.
  3. Clean breakfast dishes and use wipe to clean breakfast area. (This prevents the familiar dried and crusted milk at the bar)
  4. Wash hands and brush teeth for two minutes.
  5. Clean bathroom mess.
  6. Get fully dressed.
  7. Brush hair and set out hair accessories if needed (for our 9 year old girl).
  8. Get lunchbox (which is packed by mom and I'll address tips and ideas for a healthy lunch in future posts).
  9. Make sure room is clean and PJ's are folded.
  10. If you have extra time, read a book.

It sounds like a lot, but believe me, this is a LIFESAVER for everyone.  Not only do they know what's expected of them each day, but the parents don't end up screaming and rushed out the door.  Everyone gets a calm start to the day, which can make all the difference in the world.  Now, I may have to remind them once or twice to follow the checklist, but for the most part I am able to get up and ready at the same time they are without having to stand over their shoulders making sure they are doing what they are supposed to be doing.  It's helpful to have it printed out for them to actually have a visual aid.  In the future, I plan on laminating each child's checklist, putting Velcro dots beside each number, laminating check marks and putting Velcro on the back of each, and letting them actually "check" each item they've completed on the list.  This will help to ensure they don't miss anything and start their day off with an excellent sense of accomplishment.  Besides, what child doesn't love to see a whole slew of check marks?!?!

The Unplugged Child

Before I became a Stay At Home Mom, I was a kindergarten teacher.  All my life I have heard the words, "Go do something productive." Productive included so many things, but mostly arts and crafts for me.  As a teacher, I see many children that are completely plugged in to everything electronic and they just can't seem to grasp the idea of creative and interactive play.  With that said, we set a 30 minute time limit each school day for electronics (which include tv/movies/iPod/Nook/video games).  On the weekends and school breaks, there are no electronics past 10 AM.  That's a pretty good chunk of time seeing as our kids get up between 7 and 8 on these days.  Our school-aged children, 7 and 9, have adjusted to the 30 minute time limit (with occasional sighs and pleas), but often need a jumpstart as to what to do once they've been "unplugged".  I've come up with a printable list of activities that are available in our home that the children can do.  I printed off the list and hung it in each child's room on brightly colored paper.  This way, they can't ever say they have nothing to do! Ingenius, huh?  Use this idea with what's available in your home and help your kids BE kids! 


What can I do when my electronics time is up?

Bananagrams

Doodle book

Boogie Board Drawing Tablet

Legos and Lego Friends

Play restaurant

Play Ping Pong

Play Air Hockey

Read a book

Drive your remote controlled car

Listen to music

Make a craft

Play with Star Wars Figures

Write and make a book

Put a puzzle together

Play with Spy Gear

Draw a picture

Play a board game

Play Angry Birds Jenga

Play tic-tac-toe

The Crafty Momma: Birthday Calendar

So, I made an AMAZING project for my sister-in-law for Christmas.  I found the idea on Pinterest (like most of my ideas).  I looked for the perfect one, but tweaked it a little to make it my own.  The following is needed to make the Family Birthday Calendar:

7/8" Black Grosgrain Ribbon
Black Grosgrain Ribbon 7/8" at Hobby Lobby for $3.99


6" x 18"  Wood Plaque
Wood Plaque from Hobby Lobby ON SALE for $5.99
Wood Circles
Wood Circles from Hobby Lobby ON SALE for $2.24


2-ounce Liquid Stitch
 Liquid Stitch from Hobby Lobby for $4.99
Black and white scrapbook alphabet stickers, 2 sheets
Paint colors of your choice (usually $1 each or so from Hobby Lobby)
Small Paintbrush
A printout of the word "birthdays" as large as you want it (to use as a stencil)
 
So now you can begin:
 
  1. Get your wood plaque and paint it the base color.  My base color was tan.
  2. Then, get your wood circles (only the large ones) and paint them the same base color and one other color.  My other color was white.
  3. Paint the trim around the wood plaque to match your ribbon.  My trim and ribbon color was black.
  4. I used a font called Special Elite that I found online.  I enlarged it to about 200 pt. and printed out the word "birthdays".  It took two pieces of paper, which I cut and taped together. 
  5. I found this great technique for painting letters if you don't have a stencil.  Check out the tutorial over at That's My Letter.  You won't regret it and soon you'll be personalizing everything wooden in your house!
  6. After I painted the word "birthdays" in black and let everything dry, I began placing the alphabet stickers vertically from left to right in the order of the months.  Be careful with the spacing.  I did abbreviations for January, June, July, and December first so that I would know how to correctly space the other months.  To make it uniform I used the following abbreviations: jan, feb, mar, apr, may, jun, jul, aug, sep, oct, nov, dec.  I know some of these aren't the correct way, but it looked much better to have 3 letters for each month.
  7. After placing the stickers, I could start on the ribbon.  On the underside of the wood plaque, I hung 12 strands of ribbon (1 under each month).  Each ribbon was about 15 inches long to give room for more birthdays.
  8. Because I wasn't sure how many birthdays my sister-in-law would need for each month, I did not glue any wooden circles on the ribbons.  I gave her all the painted wooden circles and told her to add them to the ribbons as needed.  I gave her a fine tip Sharpie pen to write the names and dates on each wooden circle. 
This was such a wonderful (and rather inexpensive) gift, that I think I am going to make one for each family I know when their birthday comes around.  It's practical, functional, decorative, and an all around fun way to remember all those birthdays!
 
Post a comment and let me know what you think!


Thursday, December 13, 2012

The Crafty Momma

Before I was a Momma, I was crafty. This pretty much started as soon as I could use scissors, glue, and paper. This love for art and crafts has followed me through adulthood as I continue to make crafts (albeit a little better than the ones from childhood). Not only do I love making crafts, I love finding new crafts to create. I like to take on new projects, sometimes too many. However, I've surprised myself at times with how wonderful some of my projects have turned out.

Now that I am a Momma, crafting has taken on a whole new meaning. I want to create everything I can for our new baby girl. Thanks to Pinterest, I've been inspired to make headband holders out of oatmeal containers, wall decals out of scrapbook paper, and I've painted quotes on canvases embellished with fabric flowers.

Check this page frequently for photos of my own crafts, as well as links to creative ideas for the happy crafter in you!

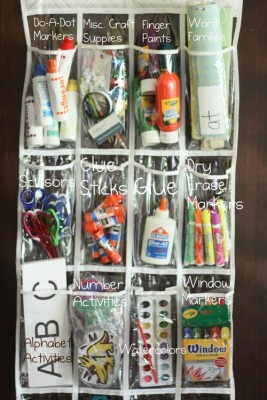
Save-My-Sanity Organization tips: Over-the-door craft organizer

Thanks to Money Saving Mom, I just got this for our 9 year old's crafts. Currently, all of her craft supplies are in a huge UN-organized toy box and, therefore, rarely get used. I'm hoping that this over-the-door shoe organizer helps her supplies stay more organized and get used more frequently. Visit Money Saving Mom for more amazing helpful tips.

The Eco-friendly Momma: Cloth Diapers

Two weeks and six days ago, we welcomed a baby girl into our family. She is the joy of my life. Before she was born, I knew I wanted to use cloth diapers. I enjoy being earth friendly and wanted cloth diapers for economical purposes as well. My mom (who also used cloth diapers) was generous enough to purchase the starter kit for G-Diapers. I've only be using them for about a week and a half, but I LOVE THEM! They are easy to use and wash. They fit baby girl wonderfully and I would recommend them to my friends.

The newborn outer shells are specially made to avoid the belly button area. There is a flushable/disposable component that you use for a newborn. When our baby girl gets a little bigger, she will actually use the cloth portion inside the diaper shell. However, to help the cloth portion not get so dirty, there is a thin liner that can be placed on top of the cloth and flushed/disposed when time to change. Did I mention that they come in some CUTE patterns, too?? I can't wait to put these little cuties on my cutie!

Shout out for Shrinky Dinks!

These are some of my favorite Shrinky Dink jewelry creations.  I've had a lot of views on these little guys and some favorites!  I recently discounted the candy corn earrings since Halloween has passed.  These are made from Shrinky Dink plastic.  I've hand drawn the designs with inspiration from Google images.  They are glued to 4 mm surgical steel posts with E6000 glue.  I currently spray them with Mod Podge Acrylic Clear Gloss, but would like to find another varnish that leaves a more glossy look and doesn't create a hazy film over time.  I've read that Glossy Accents and Utee may be better alternatives to the spray gloss.  Any ideas?


Monday, December 10, 2012

Welcome to The Versatile Momma!

Hello to all!

Welcome to The Versatile Momma!  This blog is designed for those ladies who aspire to be well-rounded Mommas.  Maybe you're like me and have two "bonus" children and a newborn or maybe you have a handful of children for which you have to come up with budget friendly weekend activities, recipes to satisfy all those little tastebuds, and organization ideas to help you keep your sanity.  Whatever your family picture looks like, The Versatile Momma is sure to have something that peaks your interest.  Check back frequently for recipes, crafts, DIY ideas, and more to help you achieve "Versatile Momma" status!

Thanks for visiting and enjoy!